Tuesday, February 13, 2018

I've Got the Blues!

Hello Everyone!

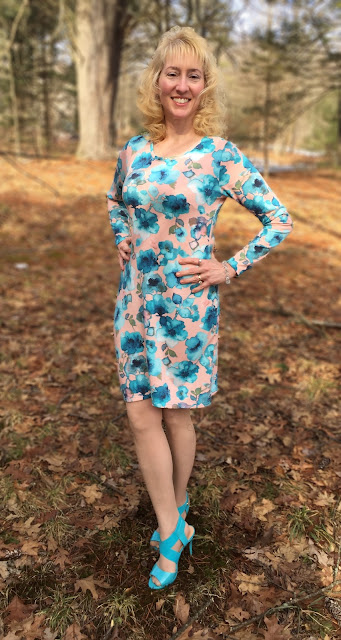
Last month I got the blues.  Not the winter blues, but some fabulous french terry blues from So Sew English.  I discovered this company via a couple of customers back in December and am SEW thankful!  It would be a disgrace to say how much I've purchased from them thus far considering the size of my stash, but my motivation is running strong right now and my machines are humming.  Here are a few pics of my Pamela's Patterns #116 Classic T-Shirt Dress in this luscious, pastel peach and blue French Terry

The inspiration behind this dress and the fabric???  My shoes!  And wouldn't you know...Pattern Review is running a contest, "Match Your Shoes".  The concept is to sew an outfit based on your shoes.  I'll admit my love of shoes.  Not a big jewelry girl, only have a few handbags, but pretty shoes are my weakness.  In addition, when my inbox fills up with sales emails from department stores, shoes are the first department to check out.  I think these were one of three pairs from a JCPenney online sale last year and they fit perfectly.  So when I saw this French Terry several weeks ago, I instantly thought of these shoes.  I've also included my pattern review info here so you don't have to open up a new window.  If you read my blog (and nobody does lol), you've seen these same alterations before.  My Pamela Classic T-Shirt pattern gets used a lot.  Here are a few more pics:


Don't let the lighting fool you.  It was cold!  It was only bearable because I LOVE cold weather.  The dress screams Spring with the floral print, but my heart belongs to winter :) .  We just had snow, but the temps have been in the 40's the past two days so my heels wanted to sink.  There were several pics with pained expressions of my almost falling over (no, they weren't included in this post ;) ).  But hey!  At least the ice melted.  Just give me more snow.
My super sale-priced shoes!  

I've included some late afternoon light pics as well.  Here's the pattern review so you don't have to open up a new window:

Pattern Description:

"A modern t-shirt dress that fits your upper AND lower body is now possible.  The classic style is perfect for any occasion--dressy, casual or work.  The best part of a nice dress?  You only need one piece of clothing to look fabulous!  Pamela's Patterns are designed with the most common fit alterations built right in --high round back, forward shoulder, full bust option, extra hip/tummy room, and a great fit in the neck and shoulder."

Pattern Sizing:

Sizing:  For the sizing, I used Small (34-36" high bust measurement) with the darted front option because I'm a C cup.

Did it look like the photo/drawing on the pattern envelope once you were done sewing with it?

Yes, all my versions including this one looked like the pattern cover!  The exceptions are when I make my own design changes or make pattern modifications.


Were the instructions easy to follow?

Of course!  Pamela has well-written patterns with tips AND YouTube video tips sprinkled about her pattern. 

What did you particularly like or dislike about the pattern?

Love the basic style with plenty of version suggestions including princess-seaming.  Pamela is detailed and thorough with her instructions and includes areas where she provides additional support via YouTube tutorials.  Various necklines, hemline and sleeve lengths are included for customization.  Once fitted, the pattern is super easy to modify for different looks if one possesses basic patternmaking skills.  The darted and undarted fronts are a great option, and the built-in extra room allows for easy draping on the body to customize the fit.

Dislikes?  Nothing.  I'm easy to please. Just give me a well-designed pattern, and I'm good to go!

Fabric Used:

A beautiful and soft French Terry from So Sew English.  I've discovered fabulous online fabric stores via my customers lately and so thankful for their fave fabric haunts.
Pattern alterations or any design changes you made:

I have been blessed to attend Pamela Leggett's classes on pants and knits.  She is fab, and that's another review.  Some alterations I already knew, but she zeroed in on a couple of areas that have really helped me achieve the best fit possible.  These are my alterations:

1.  5/8" upper body horizontal tuck on both the front, back, and sleeve pattern pieces.  Pamela determined the amount of the tuck needed and this was wonderful for me.  I couldn't tell the exact amount needed on her patterns, and since she has fitted at least a thousand people or so, she can tell just by looking at a person's body.  So helpful.

2.  Even though her patterns have a forward shoulder built in, I moved the entire shoulder seam allowance forward another 1/2" and added for 1" shoulder seam allowances.  This is pretty much what I do on all patterns and I tweak it in fabric as needed.

3.  Repositioned the dart and dart legs.  I loathe bust darts that are perfectly horizontal or close to it.  I've found that lower, more angled darts are more flattering on my body, kind of like French darts.  Also adjusted the dart point lower about 1/2" and tweaked in fabric.

4.  Altered the sleeve for forward shoulder by removing a 1/2" from the front sleeve seam allowances and moving it to the back sleeve seam allowances.  I have always been skeptical this would work well, and was pleased that this easy fix was a piece of cake that solved an issue I was making more complex (in pattern alterations) than it really was.  Needless to say, I told Pamela I was thrilled that this worked.

4.  Pamela pin-fitted the side seams on my figure for a flattering silhouette.  It's always helpful when someone with such extensive fitting talent can do this for me.   She knew the fit I was trying to achieve and with her help, I got it!

Would you sew it again? Would you recommend it to others?

See my happy face in the pics?  That answers both questions :) .  This is my wardrobe staple in my pattern stash.  Love, love, love this pattern.  Pamela's the best and so are her patterns.

<b>Conclusion: </b>

I use this pattern all the time.  It's easy to sew, fast, and produces a simple, clean silhouette.  I love redrafting this pattern and morphing it into other designs.

'Til next time...Happy Stitching!

--Kat

Monday, February 12, 2018

Sharpen the Pencil


This pencil is pretty darn sharp!  I'm loving a new-to-me pattern company, Patterns for Pirates.  The line is cute every day clothes for both home and work with plenty of hacks so repeats take on a different look.  One of my faves is the Pencil Skirt.  It's a beginner  knit pattern for a traditional, tight fitting pencil skirt. The silhouette is labeled as classic and flattering on a curves!  I'm not exceptionally curvy, but it emphasizes what I've got!  Options include: mid rise, high rise, above knee, below knee, midi length and optional walking vent.  I made the high rise, below knee, and no vent.

Did you see the pattern price on the P4P website?  It's FREE.  Yes, FREE.  I could say FREE, FREE, FREE until I'm blue in the face.  EVERYONE loves free :) !

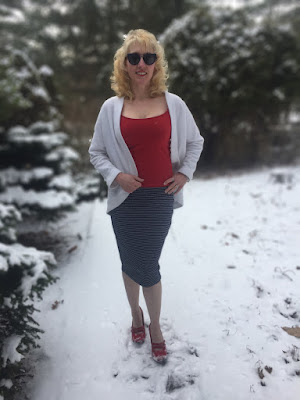
Patterns for Pirates Pencil Skirt and Jalie Cocoon Cardigan


Why not join their Facebook group and "purchase" the free pattern.  No cost whatsoever.  I purchased some navy/white striped knit fabric from So Sew English and whipped up this little number in no time.  I used my measurements and graded the pattern accordingly, however, after wearing it a day at work it felt like it was going to fall off because the fabric is super stretchy.  So I restitched the side seams and adjusted the waistband and all was good.  I was very happy it looked like the pattern on the website.

The instructions were VERY easy to follow, very detailed, and very thorough with full color illustrations.  This downloadable pattern has size overlays so you simply pick the sizes you want to print out.  It's multi-sized with is great.  Just blend between sizes and true up as needed.  Love that the pattern is free, quick and easy, and a great knit makes it flattering.  No dislikes.

The fabric used was a waffle knit from SoSewEnglish.com and there were no design changes made to the skirt other than size blending.  I did mold the fabric to fit my minimal curves.  It's fantastic that it makes me look curvy!  My conclusion of this pattern:  It's perfect for all levels of sewing, super fast and easy, and yes I will sew it again.  It's perfect for a serger project too.

The cardigan is a Jalie Cocoon Cardigan, a pattern which I purchased several years ago.  The Jalie is a paper pattern unlike the P4P patterns which are downloadable and printed out on your home printer.  However, it does look like Jalie now has downloadable ones, too, similar to P4P including layers.  The cocoon cardi was made from a substantial fleece.  It's a great pattern for both heavy and lighter knits, although the fabric used will determine the degree of drape.

The cardigan is a dolman-sleeved, loose-fitting open-front jacket.  The hem is banded and longer in the back.  The description says the cuffed sleeves stay put when you lift them...hmmm...I guess that is kind of true.  I usually just roll them up if necessary.  The description says it's a  great transitional piece or swimsuit cover up.   Maybe, but I'd lengthen it a couple of inches to cover my bum if making it as a swimsuit coverup.

As for sizes, it has an amazing 27 layers.  It has been so long since I've made this that I can't remember the size, maybe a T?  Also, it is sized for stretch knits.  I was very happy the cardi looked like the model's on the envelope, and the instructions were super easy to follow.  This project is perfect for a serger.  I love everything about this pattern and  did not make any design changes, nor alterations.  I stitched another one in a lighter weight tan fleece which has more drape.  It's great with both fabrics.

I highly recommend the Jalie Cocoon Cardi pattern and have worn it to work many times and frequently get positive comments on it.  In fact, I even taught a class on making this garment.  All the cardis came out great!  I'm going to make this one a couple more times in a lighter weight knit for cold summer days.  Yes, I did say that ;) .  It's freezing at work almost every day of the year lol.  Some of my sewing sisters know what I mean.  It seems like 50% of women are either freezing or hot, and my joke is my job is in Siberia.  It's great to have a coworker with hot flashes.  She loves my cold hands, and I love her warm arms lol.  'Til next time,

Happy Stitching,

--Kat

Tuesday, January 30, 2018

Wiggle on Over!

Dress front for the Pattern for Pirates
Wiggle Dress
Customers can be the best source of new pattern lines and new fabric stores.  I was so pleased to discover the Patterns for Pirates line even though it has been around for awhile.  Perhaps we get stuck in a rut and never look outside the box?  I don't know, but this company rejuvenated my garment sewing for 2018.

Talk about being blown away!  When I first saw the Patterns for Pirates Wiggle dress, it was destined to be a must-have pattern in my stash.  Printing out the downloaded pattern took no time at all, and the instructions include a link to only printing out the sizes needed and detailed printing information.  Assembly was a dream, unlike some other downloaded patterns.  The labeling is excellent so creating the pattern is quick and easy.

I traced off the S, M, and L sizes grading where necessary.  It a stretchy ITY knit (source:  Spandex House from several years ago), imo grading was not needed.  In a less-stretchy fabric, then yes, definitely grade.   Seam allowances are 1/2".  That
Glimpse of the Wiggle back.  
is good because sometimes 1/4" seam allowances are fiddly in a curly-edge knit.  One could add to the seam allowances and cut generous 1" in key areas for fit "insurance."  That's never a bad idea, but I didn't do this on the Wiggle.  Sometimes I do, sometimes I don't.  ITY is so stretchy so it was not a worry for me.

Garment assembly is super easy.  Just a few major seams, the addition of elastic on the neckline, coverstitch if you have one or just use a sewing machine w/walking foot.  With a serger and coverstitch, this could easily be made in an hour.    This is the perfect pattern for a beginner and I highly recommend it.  It's a super easy sew for seamstresses with experience.
One more view on this snowy day.  I don't advise to
do a photoshoot wearing ITY on a cold day!  :)

In conclusion, this is a great pattern.  Love the draft, the style options of sleeve and hem lengths, and various neckline options.  It looks great on all figures:  tall, petite, curvy, thin and everywhere in between.  Definitely head on over to Patterns for Pirates to see the Wiggle Dress on so many figure types.  This pattern is worth every penny of the inexpensive $9 cost.  And yes, I've already made another Wiggle with many more planned.  It's so versatile.

Until next time, keep stitching!

--Kat

The Winter Twist Endeavor!


  My first-ever, completed real quilt!
  
My two coworkers include my son who was hiding behind the quilt at left lol.  I'm appreciative of working with such helpful people.
Jason Yentner's booklet, The
Winter Twist Quilt.
It takes a lot to get me to think about making a quilt.  As a garment sewer, I love to take a 2-dimensional fabric and turn it into a 3D shape.  The challenge of fitting and molding a piece of cloth to the body to churn out a well-fitted garment that enhances the figure is a great feeling for me.  It's probably why I've never taken to quilting.

However, every once and a while a beautiful design comes along that inspires me to try my hand at making a quilt.  When I saw the Winter Twist booklet by Jason Yentner at work, I fell in love with
the design. We had the matching fabric collection too!  One day a customer purchased the booklet and encouraged me to try my hand at making this quilt.  She said, "It's actually very easy."  So I read the instructions, and it really was a simple, basic design.  The fabric and booklet made it way to the counter for purchase that day and the rest is history.

Honestly?  It took a while to cut all the pieces to a specific size and dimension.  It's pretty boring.  But I stuck to the task at hand and got everything cut.  Quilting definitely takes patience, so acceptance was key to spending a few days cutting everything out to exact sizing.  Anyone who knows me knows I'm NOT an exacting person.  Quilting here and there has made be a better garment sewer because of more attention to detail and the precise nature required for piecing.

Blocks stitched, border added, got the quilt sandwich 
assembled, now for pinning!
Sewing the blocks, again, was boring.  Perserverance is key!  Watching a few good TV shows helps fight the boredom.  Each block was assembled, then the blocks were all stitched together.   Then I added the border.  The mitered border as a beginner quilter is not the easiest thing to do with possible stretching across the grain, but I managed to get an acceptable result. I asked my coworkers questions about quilt batting, watched a few videos, and felt confident putting the sandwich together and pinning everything.  Sure, I could have used basting spray, but I felt more confident with the pins as a newbie.  Start at the middle, then move out from there.

Quilting supplies:  FMQ gloves, size 
14 Topstitch needles, good thread
and rulers with grips

Now for the quilting!  I was a bit befuddled at which quilting designs I should use.  Should I use free motion?  Rulers? Rulers won out.  The Handiquilter Ruler of the Month program was in full force at work, so I decided to use the rulers and create designs.  My coworker helped me choose a basic ruler design for the center blocks, but my designs on the edges and borders were inspired by the Quilting with Rulers class by Amy Johnson over at Craftsy.  She is an excellent ruler quilting instructor, and I highly recommend her classes, but my suggestion is to enroll through Amy's website if you're interested because I think the instructors get better financial compensation doing it this way.  Most of the more intricate designs were inspired by what I learned in Amy's Craftsy classes.    

Here is the simple center block design suggested by my
coworker.

I was loving the ruler work, and one simple
slice ruler create this fancy design.
Whew!  Binding added.  Almost 
finished.
When everything was done, it was time for the quilt binding.  My go-to resource for adding binding is Missouri Star Quilt Company's Jenny Doan's Ultimate Quilt Binding Tutorial.  Missouri Star Quilt Company is known by every quilter, but for garment sewers, this is a new-to-me company I discovered in the last several years via customers at work.  Trust me, I've learned a lot about quilting simply by hearing people talk about their quilts lol.  I've probably done about 3 quilt bindings in my life, and every time I screw up!  It's not just me. My customers have said they've done the same thing. Jenny's video is great, but somehow I still manage to twist my ends the wrong way, seam rip, then finally do it the right way.  When it does work the second time, it's brilliant!

Overall, I'm incredibly pleased with my first, real quilt.  By the
And finally?  A little crystal bling and my
embroidered snowflakes at the corner cuz I'm not as
proficient at the mitered quilt corners as I'd like to be.
time I finished, my confidence in using rulers soared and ultimately, my free motion skills improved.  What are my 2018 quilt projects amidst a slew of garments?  My king-size quilt is ready for quilting, and yes, I'm doing it on my Elna 760 with the 11" bed.  It will be a struggle, but it's going to happen.  Towards the end of the year, I'm planning on making a beautiful bargello.   Goals.  It's good to have them.  I'll never consider myself a quilter, just a garment sewer who occasionally makes quilts.  And as I've said before, my occasional quilting projects have made me a better garment sewer.  Who would've thought!?!?

Are you a garment sewer who has never tried their hand at quilting?  I encourage you to find a beautiful design and try it.  The perfectionism of quilting has definitely enhanced my garment sewing for the better!

Until next time, Happy Stitching!

--Kat